Thursday, November 27, 2014

Pumpkin Spice Cupcakes with Maple Cream Cheese Frosting

As a woman of science, I've always found it fascinating how powerful the connection between our senses and our memories is.  How the smell of a cigar triggers old memories of my grandfather.  How the sound of a once favorite song brings me back to certain time and place, forever dedicated to the friend whom it reminds me of in the first place.  How just the sight of my hometown brings back sporadic memories and feelings from my childhood. 


I guess it's no surprise then that food, which enlivens all of the senses, can also carry strong memory associations.  It's the way that apples remind you of Fall and peppermint reminds you of the winter holidays.  To my own senses, these pumpkin cupcakes remind me of my first Fall in NYC, around the time I started this blog.  I was living in a shoe-box of an apartment, still having to think an extra second when getting on the subway to convince myself I wasn't going the wrong direction, making friends in a city where I knew no one from my past, and picking up the pieces of a broken and failed relationship.  These cupcakes and the little pumpkins on top became a foodie craft project of mine to focus on in the midst of all of the challenges of a new life and the adjustments to it.


Fast forward 2.5 years, I have a (somewhat) spacious apartment in Brooklyn where the hipster in me can run wild, and I know my way around the city, including which end of the train I need to be on for the most efficient commute possible.  I have many friends in the city both new and old (it seems that I started a trend within my friends of moving to NYC - at least I like to think I did), and I'm stronger and very (maybe sometimes too) independent. These pumpkin noms have turned into an annual tradition, not only because they remind me of where I started in NYC, but also because they're so darn tasty and adorable!

I found these cupcakes and decorations to be super easy to make (parents - these would be a great DIY project with your kids), and I also love the fact that the recipe is conveniently divisible (to spare your coworkers too many more sweets after the Thanksgiving holiday).  As for the flavor, the spices bring a strong punch, which means the flavor of the frosting doesn't hide the pumpkin goodness underneath it.


So, that said, forgive my nostalgia, start your own pumpkin craft project, and let your senses spark new memory associations over this Thanksgiving holiday!  Who doesn't love a little more pumpkin in their life?


PUMPKIN SPICE CUPCAKES w/ MAPLE CREAM CHEESE FROSTING
(Adapted from Sweetopia)
Makes 10-12 cupcakes or ~36 mini cupcakes

Ingredients:
Cupcakes:
1 cup all-purpose flour
1 tsp baking powder
1/2 tsp baking soda
1/2 tsp salt
1 tsp ground cinnamon
1/2 tsp ground ginger
1/4 tsp ground cloves
1/4 tsp groung nutmeg
2 large eggs
1 cup canned pure pumpkin puree
1/2 cup granulated sugar
1/2 cup light brown sugar, lightly packed
1/2 cup vegetable oil

Frosting:
4 oz. cream cheese, at room temperature
1 stick unsalted butter, at room temperature
2-3 Tbsp real maple sugar
1 1/2 - 2 cups confectioners sugar
Sweetened coconut, toasted (optional)

Pumpkin/Leaf Decorations:
Fondant icing
Food coloring gel, orange
Almonds, whole
Bay leaf or thyme


Variations:
Minimalist Décor: Making your own pumpkins can be more time than you're willing to spend.  Place a candy corn pumpkin on top and call it a day.
Shrink 'Em: Mini cupcakes are just the cutest little things.  Make 'em mini for a party or for portion control (even though we all know that never works).  This recipe also halves easily.
Add a Layer:  Add a layer of butter pecan or cinnamon spread/icing or jam in between the cake and the frosting.


Instructions:
*HINT: Use a trigger ice cream scoop, like this one, to fill your cupcake liners perfectly!

Cupcakes:
  1. Preheat the oven to 350 degrees.  Line muffin tin with paper cupcake liners.
  2. Whisk together the flour, baking powder, baking soda, salt, cinnamon, ginger, cloves, and nutmeg, into a medium bowl.
  3. In a large bowl, whisk together the eggs, pumpkin puree, granulated sugar, brown sugar, and vegetable oil.  Add the flour mixture and stir until combined.
  4. Fill the cupcake liners 2/3-3/4 full, but evenly across all.  Bake for 18-20 minutes, until a toothpick inserted in the center comes out clean.
  5. Set pumpkin cupcakes aside to cool completely.
Frosting:
  1. Cream the cream cheese and butter together either with a hand mixer or in the bowl of an electric mixer fitted with a paddle attachment.  Add maple syrup.  Slowly add the confectioners sugar and beat until smooth.
  2. Once your cupcakes are cool, ice them with a butter knife or large piping bag and tip of your choice.
  3. Sprinkle toasted coconut on top and any decorations you made.
Pumpkin/Leaf Decorations:
  1. For the pumpkins, add a small drop of gel food coloring to a about a 1/2 Tbsp. of fondant icing and mix until the coloring is even.  Use your hands to roll the icing into a ball, and use a toothpick to make indents from top to bottom (like a beach ball).
  2. Chop an almond lengthwise to make the stem and break up a bay leaf for the pumpkin leaf.  Insert the stem and leaf into a small hole at the top of the pumpkin created by the toothpick.
  3. For the leaves, mix the fondant with the food coloring gel as with the pumpkins.  Press the colored icing into a chocolate or candy mold of your choice.  Use a knife to cut off the excess and carefully take the icing out of the mold.

Tuesday, July 29, 2014

Fromage Blanc Ice Cream w/ Blackberry Jam Swirl + #IceCreamForOXO

When I go to a restaurant, I often wonder where the chef got the idea for the meal I'm eating.  What was it that inspired him/her to use that compound of ingredients that make every bite so outrageously divine?  I wonder what experience they had that triggered the chain of thoughts and motivation to create it.  Unfortunately, it's impossible that we will have the same experiences as others, but the good news is that it is guaranteed that our interpretations of the same or similar experiences will always create unique outcomes.  Not to mention the inspiration domino effect that will come from that meal I just shared with several others in the restaurant that night. 


On a recent visit to Shake Shack, one of the city's best burger joints, a friend and I felt the New York summer heat collide hard with our love of cold summer desserts.  The Wednesday ice cream special (yes, you can literally go back every day for different flavor - dangerous...?) was a fromage blanc ice cream with raspberry swirl, and needless to say our curiosity got the best of us.  As we finished our burgers and quickly dived into the already melting ice cream, we pondered over what fromage blanc actually was - "white cheese?", "cream cheese?", "yogurt?".  I'm sure the group of French men at an adjacent table were probably rolling their eyes at us, although as it turns out we weren't too far off.  It most closely resembled a cheesecake flavor -  tangy, slightly cheesy, and a silky smooth texture.  With the taste still on my tongue and a little encouragement from my friend, though it didn't warrant much, I left with the gears in my head turning and off I was, ingredient shopping.


Commericial break...

For this blog post I was given the opportunity, nay, inspiration(!) to participate in one of OXO's blogger campaigns, #IceCreamForOXO.  I was sent a box full of handy OXO kitchen products to help me create my new ice cream recipe. 
  • The Small Silicone Spatula helped me almost every step of the way, from stirring to pot scraping, and I found it to be just the right size for scooping every bit out of small corners.  
  • The 2-Cup Angled Measuring Cup was already a favorite of mine, because of how easy it is to measure liquid while looking from above, not to mention it has a great pour spout.  
  • The Mini Chopper saved me a lot of prep time and created the bite-sized pieces of mint chocolate for the ice cream topping.    
  • I stored my ice cream in the LockTop Container.  As opposed to the pints I normally use, this container provided the artist in me a canvas for mixing in the jam swirl.  
  • My unexpected favorite product of the group was the Solid Stainless Steel Ice Cream Scoop (since I have 3 other ice cream scoops at home - clearly I don't joke around when it comes to ice cream).  It worked surprisingly well with its pointed shape that can plunge right into that ice cream, no problem.  I've used it on other, harder ice creams and it doesn't disappoint.
Disclosure: I am employed by OXO and received these products for free. The views and opinions expressed on this site are my own alone and do not represent the views of OXO and/or its affiliates.


Now back to the ice cream...

What is fromage blanc?
Simply put, it's a low-fat, or in many cases fat-free soft cheese, which looks most similar to a yogurt, sour cream, or creme fraiche.  It has only a faint hint of tanginess and is much less dense than cream cheese, yielding a lighter texture and making it a good substitute for your regular or greek yogurt fixes. When it's combined with the mascarpone cheese in this recipe, the tanginess really comes through and that's where the ice cream begins to taste "cheesy" and rich like a piece of cheesecake.


Where to find fromage blanc?
I found the one I used at Whole Foods, conveniently located next to the mascarpone cheese I needed for this recipe as well.  They also sold more specialty flavored versions, which may be something I will try in the future.
Others: Amazon, local cheese shops, or if you're ambitious enough you can make your own!


Had it not been for burger night and a little push from my sweet tooth, I probably never would have tried fromage blanc, let alone thought to put it in an ice cream.  For the base of this recipe, I worked with one of the few fromage blanc ice cream recipes I could find, and used the fruit in my refrigerator to decide the jam swirl flavor. 

So...have you been inspired yet?


FROMAGE BLANC ICE CREAM W/ BLACKBERRY JAM SWIRL
(Adapted from FEAST)
Makes: 3-4 cups  

Ingredients:
1/2 vanilla bean or 1/2 tsp. vanilla extract (*see note in instructions)
3/4 cup + 1 Tbsp. sugar
1/3 cup whole milk
2/3 cup heavy cream
3 large eggs, preferably brown
1 8oz. package (3/4 cup) fromage blanc, such as Vermont Creamery
3 Tbsp. mascarpone cheese
1/3 cup blackberry (or any other berry) jam or preserves
Mint chocolate such as Lindt's for topping, chopped (optional)
If making jam:
1 cup blackberries (I actually used a mixture of blackberries and black raspberries for this version)
1/2 cup sugar


Variations:
Flavor of the Week - Change up the flavor of jam that you swirl in or the flavor of fromage blanc if you can find it.
Substitutions - Substitute a low-fat plain yogurt for the fromage blanc.
Beware - Fromage frais and fromage blanc are not the same!

Instructions:
Blackberry Jam (makes approximately 2/3 cup)
  1. Combine berries and sugar in a medium saucepan.  Bring to a boil over MED heat, stirring to dissolve the sugar.
  2. Continue to boil the mixture for 8-10 minutes.
  3. Cool slightly and push the mixture through a fine mesh strainer, using a spatula, to remove the seeds.
  4. Place the jam in a container and cool in the refrigerator until needed for the ice cream.
Fromage Blanc Ice Cream
  1. Add sugar to medium bowl.  Cut vanilla bean in half lengthwise and scrape the contents into the bowl with the sugar (*skip this step if using vanilla extract).  Use your fingers to break up any clumps of vanilla and mix together with sugar.
  2. Add the egg yolks to the sugar mixture and whisk until combined.
  3. In a medium saucepan, heat milk and cream, and scraped vanilla bean pod just until it begins to simmer, stirring occasionally to break up the film of the cream.
  4. Slowly add 1-2 Tbsp. of the warmed milk mixture to the sugar mixture, whisking to combine.  Continue to add the remainder of the milk mixture, slowly in a steady stream, whisking constantly to avoid cooking the egg.
  5. Rinse saucepan and pour mixture back into it.
  6. Heat on MED-LOW to MED, stirring frequently, until the custard thickens, about 10-15 minutes.  Strain into a mixing bowl and cool completely in the refrigerator.
  7. After the custard base has cooled, add the fromage blanc and mascarpone, mixing until combined completely.  A whisk works best for this.
  8. Freeze in ice cream maker according to the manufacturer's instructions.
Assembly
  1. After the ice cream has been made, scoop half into a shallow container, such as this OXO one, in an even layer.  Add several scoops of blackberry jam in lines across your canvas, then repeat with the second half of the ice cream to create two layers.  The ice cream will have the swirled look when it is scooped and served.
  2. Place in freezer for several hours to allow ice cream to harden.
*I recommend adding some dark mint chocolate bits as a final touch, but this ice cream is delicious as is too.

Sunday, March 9, 2014

Shakshuka

Life changes are inevitable, and in my opinion very healthy experiences and something you can grow and learn from.  No, it's never an easy thing, and some people are better at it than others, but in the end it mostly seems to be worth the stress and struggle.  All you can do sometimes is just sit back and enjoy the ride, and keep the positive juices flowing.

Shakshouka


There are lots of changes happening around me this month.  For one, the weather is hinting that spring is coming...finally.  But the biggest change is that in a couple of weeks, one of my best friends will no longer also be my roommate.  After almost a year and a half in the same apartment, Rachel is moving out and moving on, taking the next big step and moving in with her boyfriend.  I of course have bittersweet feelings since I will no longer be seeing her every day, but I couldn't be happier for her new life.  She has taught me so much about cooking, introduced me to so many new foods (and cheeses!), and has been my partner in crime for exploring all of the amazing food my neighborhood has to offer.  And don't worry, we will continue to share recipes and have foodie get-togethers as usual and as often as possible.  I will however miss our spontaneous weekend brunches the most, and so, Rachel, I toast this brunch to you.

Stay tuned for the next chapter of food creations.  Another close friend of mine is moving in, which I am very much looking forward to, and I have no doubt we will find just as many food adventures.  Like they say, when one door closes, another one opens.

Cheers!


It was Rachel, in fact, who introduced me to this recipe and the cookbook it comes from, and I am so grateful for it.  For those who haven't had the chance to try this cookbook, it's full of recipes created by the cultural influences of two men who grew up in Jerusalem, one from the Arab side, the other from the Jewish side.  Every recipe has a unique and creative flair, and interesting ingredients and combinations.  Not to mention the pictures are GOR-geous. I highly recommend this cookbook as a staple in your kitchen.  Everything I've made from it has tasted so, so good, and this shakshuka recipe is no exception.

Though shakshuka could realistically be served for any meal, I love serving it to brunch guests at "Shelley's Café" the most.  It's a guaranteed hit every time, as people are always impressed with the dish.  Even better, it's relatively easy to make and can be modified based on what seasonal vegetables you have.  Sounds like a perfect change to the menu, doesn't it?


SHAKSHUKA
Serves: 2 to 4
Ingredients:
2 Tbsp. olive oil
1 Tbsp. harissa (*see recipe notes)
2 tsp. tomato paste
2 large red bell peppers, diced into 1/4-inch cubes
4 cloves garlic, finely chopped
1 tsp. ground cumin
5 large, very ripe tomatoes, chopped (5 cups in total); canned are also fine
4 large free-range eggs, plus 4 egg yolks (or 8 full eggs total)
1/2 cup greek yogurt
salt
2-8 slices white bread, olive bread, or pita, for dipping
Variations:
Eat seasonal - Try substituting eggplant or potatoes instead of tomatoes (although I think this version is the best)

*NOTE: The original recipe calls for 2 Tbsp. of harissa, but beware of how spicy your harissa paste is.  I suggest starting with less, and adding more if you can handle the heat.  You can find tubes of harissa near the tomato sauce and paste in the grocery store, or order it online.
Instructions:
  1. Heat the olive oil in a large frying pan over medium heat and add the harissa, tomato paste, peppers, garlic, cumin, and 3/4 tsp. salt.  Stir and cook over medium heat for about 8 minutes to allow the peppers to soften.
  2. Add the tomatoes, bring to a gentle simmer, and cook for a further 10 minutes until you have quite a thick sauce.  Taste for seasoning.
  3. Make 8 little dips in the sauce.  Gently break the eggs and carefully pour each into its own dip.  Do the same with the yolks.  Use a fork to swirl the egg whites a little bit with the sauce, taking care not to break the yolks. 
  4. Simmer gently for 8 to 10 minutes, until the egg whites are set but the yolks are still runny (you can cover the pan with a lid if you wish to hasten the process). 
  5. Remove from the heat, leave for a couple of minutes to settle, then spoon into individual plates and serve the yogurt and bread.

Monday, January 13, 2014

Boozy Peppermint Milkshakes

New York City has been feeling a good bit of freezing lately, and Mother Nature does not seem to be letting up anytime soon. But true to its nickname, this city never stops moving.  That's why when we get lucky with a grey or snowy weekend day, we take full advantage of it by curling up in a ball on the couch, sipping hot coffee or tea, and taking a break from the hectic.  We relax, take a deep breath, and start a long day of whipping up our favorite comfort food recipes.


Okay, so I may be among a small handful of people who actually spend the lounge days in the kitchen.  But like so many other New Yorkers, no sun and chilly weather means no guilt for staying inside, and that opens up a large window of time for cooking.  These type of days are...cooking marathons.  My friend and I baked seven different types of Christmas cookies in one day this past year. And another day we tackled brunch, pickling, and bread, all before dinner time. 
 
Depending on the season, different food trends tend to surface.  During the summer months, rainy days are filled with creative ways to combine the many things we just bought at the farmers' market.  Fall dreary days yield lots of soups and homemade breads.  Winter brings cold and snowy days, which inevitably call for cocktails and desserts, made with all of the familiar holiday flavors --   cinnamon, citrus, peppermint.


Why is it that peppermint is something we tend to crave in the winter, in the coldest of months, when the very taste of it is so cooling?  Maybe it's the nostalgia of the holidays that drives me to seek out this flavor.  It certainly proves to be the perfect companion for this winter dessert.


BOOZY PEPPERMINT MILKSHAKES
(Recipe idea from this blog)

Makes: 2 pint glass servings
 
Ingredients:
1 cup almond milk
1/2 cup coconut milk
2 Tbsp. sugar
1/4 tsp. peppermint extract

1 1/2 shots Peppermint Schnapps liqueur
1 cup ice
crushed candy cane pieces, for garnish

Variations:
Not boozy enough? - Add another shot of rum or bourbon
Virgin - Add 1/4 tsp. more peppermint extract and 1 Tbsp. more sugar

"It's chocolate, it's peppermint -- it's delicious!" - Add 1 Tbsp. chocolate chips

Instructions:
Add all ingredients to a blender and puree. 

*HINT: You have several options for how to get the crushed candy cane pieces to stick to the rim of a glass.  Many websites suggest dipping the rim in marshmallow fluff.  But if this isn't something you have just lying around, a simple mixture of sugar and water will do the job just fine.  Mix 3 Tbsp. sugar with 2 Tbsp. water.  Dip the rim of the glass in the sugar-water mixture, then into the candy cane pieces.
 
My disclaimer to the reader:  There's a reason I didn't include the "V" word (Vegan) in the title of this post.  Maybe it was my desperate attempt to trick you into trying something that sounds scary, but is in reality very tasty.  I am in no way a vegan myself, and nor do I intend to be, but I do find excitement in building new concoctions with ingredients I wouldn't normally use.  As with anything, there are so many variations, and I think they all deserve a fair chance.
 

Sunday, November 10, 2013

Apple Pancake: Birthday Brunch

I'm very thankful for the Fall hues that I get to experience up here in the Northeast, something I really missed when I was living in Georgia.  I can't help but smile when I see the decorative Indian corn husks, signs pointing to apple picking fun, and large orange pumpkins taking over small shops on the side of the road...or at least that's how it is outside the NYC bubble. 


Since Fall (along with most things) is a little different in the City, I decided to escape to the Berkshires in Massachusetts with a couple of close friends for my mid-October birthday celebration.  It was good to take time to explore the scenic views before New York minutes swallow up the season.

Relaxation was of course a priority on the agenda, along with hiking Mount Greylock, and the farmer's market to pick up fresh produce and a hot, buttery cider doughnut (aka Heaven).  Then there was lots (and I mean stretchy-pants-lots) of cooking and wine "tasting".  To most people, cooking on your weekend getaway may not sound like the best of times.  But for someone like me (and hopefully you can relate so I don't seem totally crazy), I saw it as an opportunity to try new foods with people who were equally excited about it.

Making meals for friends and family brings new opinions and influences to the mix.  It means experimenting with no judgment, and getting to share that food experience with the people you are close to.  I have to say, it was quite a successful outcome, with 6 restaurant-worthy gourmet pizzas pushed out from the kitchen for dinner (courtesy of our amateur pizza chef and friend, Rachel) and an amazing birthday brunch using recipes from a favorite food blogger of mine, Love & Lemons.
The other brunch recipe we made: Sweet Potato and Brussels Skillet


The main ingredient for this dish is truly an iconic one and I don't think I could've picked a better one for this occasion.  Aside from the apple's association to all things Fall, it's the state fruit of both New York and Washington, the fruit that poisoned Snow White, and the name of probably the most popular tech gadget company in the world.  Oh, and my favorite one...the famous fruit that hit Sir Isaac Newton on the head. 
 
Apples have quite the reputation in our society and in our daily lives.  This apple pancake recipe is great for brunch with a small group, easy to make, and of course amazingly delicious.  You know that cider doughnut ecstasy you were drooling over earlier?  Yea, it's like that.


APPLE PANCAKE
Makes: 2-3 servings as main dish or 5-6 servings as a side dish
 
Ingredients:
2 Tbsp. butter
3 apples (I used red), peeled, cored, and sliced thin
1/4 cup brown sugar
1/2 tsp. cinnamon
3 large eggs
1/2 cup milk (or almond milk)
2 Tbsp. all-purpose flour
1/4 tsp. baking powder
Powdered sugar, for dusting (optional)
 
Variations:
Gluten Free - Use a GF flour such as spelt or brown rice flour.
Local Friendly - Use as many ingredients from your local farmer's market as possible.  At the very least, you should be able to find brown eggs, apples, and fresh milk.
 
Instructions:
  1. Preheat oven to 375 degrees F.
  2. Combine brown sugar and cinnamon.
  3. Whisk together eggs and milk.
  4. Mix together flour and baking powder and stir it into the egg/milk mixture.
  5. In a large oven-safe skillet (I used a 10" cast iron), melt butter and add the apple slices and 1 Tbsp. of brown sugar mixture.  Cook, stirring until soft, about 5 minutes.
  6. Pour the batter over the apples and sprinkle the remaining brown sugar mixture evenly on top.
  7. Transfer the skillet to oven, and bake until it puffs, around 18-20 minutes.
  8. Dust with powdered sugar before serving.

*HINT: To dust with powdered sugar, use a fine metal sieve or strainer.  Place a small spoonful of powdered sugar in the sieve, hold over the pancake, and gently hit the sieve with your free hand.
Another technique?  Use a tea ball.  Any will work, but I favor this OXO tea ball.

Thursday, July 11, 2013

Strawberry Basil Ice Cream

Other than the lengthening days of sunlight, the growing desire to wear shorter pants, and seasonal openings of the local amusement parks, what's the thing that truly signifies summer is right around the corner?  The first sight of strawberries.


Spotting them for the first time of the season at the local farmer's market will make the heart begin to race, followed by thoughts of "what will I make with them this year?" and "how many is too many?".  The answer to the first question is an easy one for me, after having been in this wonderful dilemma before (don't worry, I will share some of my ideas).  The second is usually not controlled by my brain but rather my craving level for strawberries at the time of purchase.  Let's just say that level is almost always high... So far this year I've purchased 3 pints from the farmer's market, received 2 pints in my CSA, and picked another 8 pints at a strawberry field in New Jersey.  Not to mention the ones my roommate brought home that were shared.

Strawberry picking is a fun and rewarding experience, for adults as much as children, and I think everyone should do it at least once in their life.  Not only does it teach you an important lesson in where your food comes from, but it's very relaxing and enjoyable to walk between rows and rows of strawberries searching for the perfectly shaped and deep-red colored, taking tastes of your gatherings all along the way.  I've spent hours filling up buckets or flats of these berries, and I look forward to my once a year strawberry picking.


I actually found this recipe after my first strawberry picking adventure, which yielded way more crop than I could ever hope to finish one at a time.  Now, it has become an annual recipe, which I try to only make from strawberries picked myself.  Yes, I could use store-bought, or out-of-season berries other times of the year, but trust me when I tell you that you need that fresh and sweet strawberry taste. 

Strawberry and basil seems like an odd combination, especially in ice cream, but I've seen it pop up on menus a lot lately.  It's become one of my favorite pairings, and the reason I love this ice cream so much is because it's one of the rare foods that will give you not one, but two distinct punches of flavor.  Strawberry...then basil.  I can just imagine my taste buds celebrating as the taste hits two different sets of them.  Take your first bite nice and slow to give your mouth the full indulgent experience.       


**Other great strawberry pairings you ask?  Just follow the season...  First comes asparagus in late spring, which kicks off the green vegetable season (this combination is best in salads).  Rhubarb follows shortly after (mix with strawberries in pies/tarts, ice creams, or cocktails).  As the season moves into early summer, pair them with blueberries, squash, and of course in salads.  Strawberry jam is always a good option too.

STRAWBERRY BASIL ICE CREAM
(Adapted from eCurry's recipe)
Makes: ~5 cups (2.5 pints)

Ingredients
1 cup half and half
1/2 cup whole milk
1 pint fresh strawberries + 1 cup fresh strawberries, washed, and hulled
1 cup loosely packed fresh basil leaves (no stems)
3/4 cup sugar
Zest of 1 medium lemon or lime
Pinch of salt
1/4 cup blanched and slivered almonds, slightly toasted


Variations:
Substitutions - Replace half and half with heavy cream and whole milk with half and half.  Or, for a healthier version, replace half and half with whole milk and whole milk with 2% milk.
Recommendations - Use milk and cream from a local source, such as the farmer's market, use fresh strawberries, and pick basil from your garden if you have one.
Gluten Free


Instructions:
*HINT: Save empty pint ice cream containers to store your own ice cream creations.  The plastic ones work best for multiple uses.
  1. Blend half and half, milk, 1 pint strawberries, basil leaves, sugar, and lemon or lime zest, and salt.
  2. Chop the remaining strawberries and set aside.  These will be used for extra pieces (optional)
  3. Crush nuts slightly to release oil.  Set aside.
  4. Combine all ingredients including nuts and strawberry pieces.  Pour slowly into an ice cream maker and follow manufacturer's instructions.

Wednesday, June 5, 2013

Mangosteen and My Shanghai Adventure

One of the perks of my line of work (one of the many) is that I get to do some international travel. Since moving to New York almost a year ago, I've already gotten to venture to China for my new job. The trip was an exhausting two weeks with what seemed like endless traveling and factory visits, but fortunately I was able to squeeze in some personal time to explore a new city.


It was my first time in Shanghai, and although it seemed to be overwhelming in size (and this coming from a girl who lives in NYC), I found the city to be very charming and European, with a lot to offer in terms of history, culture, and food. I was also very lucky to have a personal tour guide, a friend of a friend and 4 year resident of Shanghai. He gave me the "local" experience, which means less crowds and limited tourist attractions - Hallelujah! As I travel more and more, these are the experiences that I appreciate the most. Being able to do what the locals do and eat what the locals eat really gives you a perspective on how others in different countries or cities live their lives. It's a lot like getting a break from your own life to enjoy all the good in another's.

In an attempt to document my trip and to recommend activities and restaurants to those who may travel there in the future, I present to you my 27-hour whirlwind visit:


  • Chinese lunch
  • Quick tour of the French Concession (this is the area where I spent most of my time)
  • Tian Zi Fang Market
  • Tibetan restaurant in the market for tea and cold noodles
  • Ex-Pat cookout on the roof of an old Shanghai-style house (They had made burgers and guacamole - 2 things I know I couldn't live without. Considering how difficult it is to find these foods in China, especially avocados, it just proves that where there's a will, there's a way.)
  • Dinner at an Uyghur restaurant, called Yeli Xali aka "The Silk Road"


  • Walk along the Bund during sunrise
  • Massage on Dagu Road
  • Lunch at a Thai restaurant, Qing Mai Heaven = best Thai I've ever had
    *Highlights: Green Papaya Salad, Lemon Fish

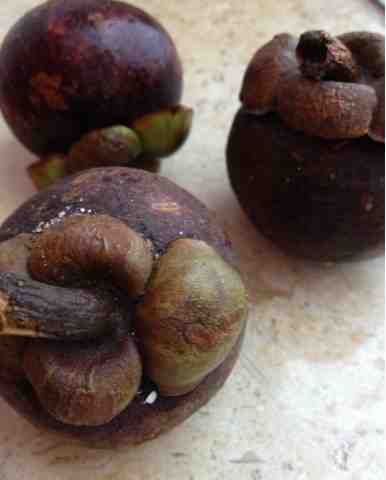
My temporary tour guide is actually who I have to thank for my introduction to this interesting fruit, the mangosteen. I know your first question is if it is related to the mango, but it is not, and a quick Google search will confirm that genetically they are totally different. It is both delicious and has health benefits, which makes me extremely jealous of its native locale.

The vast majority of the gems are grown and sold in Southeast Asia, and finding them anywhere else in the world, especially in the States, is very difficult. I have yet to investigate my Chinatown, so it's possible that I will find them here someday.


So what's the big deal? Well, they're certainly a different taste than anything I've had, and color too. You only eat the white, citrus-like sections inside, which are protected by a thick, bright pink layer. They are both sweet and tart at the same time, and remind me of a cross between, well, a lot of things; sections like oranges, sweetness of peaches, fleshy texture of plums. That perfect balance of acidity and sweetness left me craving more.

If you ever have the opportunity to jet set to that part of the world, this is one fruit you don't want to pass up.
 

Sunday, May 5, 2013

Huevos Rancheros

Happy Cinco de Mayo! This holiday is a personal favorite of mine, mainly due to my never-dying love for Mexican food and flavors. There’s something magical about how such simple ingredients always taste so good together. Messy and heavy, spicy and crunchy, it’s a comfort food that can’t be beaten. And let’s be honest - guacamole is probably the best food combo ever created. Did I mention I’ve been pining over avocado temporary tattoos?  


Talk about a great example of food bringing people together, too.  Fiesta time!  The weather tends to be very pleasant this time of year, which presents the perfect reason to gather a group of friends for a Mexican dish potluck and some tasty margaritas y cervezas (guess what I’m doing today).  It’s nothing but a day of fun, filled with random sombrero sightings, fake mustaches (when did this become a trend, by the way?), and if you’re lucky a piñata to get some of that work-week stress out of your system. 
 
As I talked to my friend who is off to Cancun this morning, I couldn’t help but feel a pang of jealousy.  But, for those of us who do not get to enjoy the real thing today, these are some of my picks that fulfill the cravings just fine.
 
Atlanta area:
Bone Garden Cantina
Taqueria el Ray del Taco, Buford Highway

Seattle area:

Taco Truck, Everett
NYC area:
Chavela’s, Brooklyn
Mole, Upper East Side (amazing guacamole)
 
HUEVOS RANCHEROS
(Adapted from
Smitten Kitchen's recipe)
Makes: 1-2 servings
Ingredients:
cooking spray
2 corn tortillas
1.5 ounces cheddar cheese, shredded
2 eggs
salt, to taste
freshly ground pepper, to taste
1/2 can black beans
ground cumin, to taste
ground cayenne pepper, to taste
extra toppings (see below)

Toppings:
cheddar cheese, shredded
fresh salsa, or taco sauce
avocado
sour cream
cilantro

Variations:

Gluten free - Most corn tortillas are GF, but double-check the brand you are buying
Other toppings - Jalepeno, corn, queso blanco cheese (or feta)
Instructions:
  1. Heat up skillet (I used 2 skillets, one for each egg) on MED.  Once heated, spray skillet(s) with a cooking spray or oil spray.  Add tortillas and heat until underside begins to brown.  Flip tortillas, sprinkle shredded cheese onto slightly browned side.
  2. Let cheese melt slightly, then crack one egg over each tortilla.  Season each egg with salt and pepper.
  3. Meanwhile, heat black beans in a small saucepan on LO.  Sprinkle cumin and cayenne pepper over beans and stir.
  4. When egg on the tortilla begins to turn white, use a spatula to flip the whole thing over.  Cook for an additional few minutes (1-2 minutes if you like your egg a little runny).
  5. When eggs are cooked, flip over again onto a plate and put your favorite Mexican toppings on top.

Sunday, February 3, 2013

Grapefruit Cupcakes with Honey-Grapefruit Cream Cheese Frosting

Newsflash!  Winter is here, and so is the struggle to find fresh and appealing produce to eat and cook with.  Though impressive that my farmer's market is open year round, even their produce section has been a little bare the past couple of weeks.  But fear not friends, because there is one bright citrus that can bring color and life to the winter blues...the grapefruit!  Indeed, these mouth-puckering fruits are in season, so it's time to be bold and to search for creative recipes for them.


I love grapefruits for many reasons, the most dominant because it reminds me of my dad.  Growing up, every winter my family would buy a large box of citrus fruit to support the local marching band (yes, I was in the band).  And every morning during those winters, a grapefruit was breakfast for my dad.  I would watch him methodically cut each section and somehow manage to scoop out every drop of juice.  Of course, back then, grapefruit was much too bitter for my taste, so I practiced his method with oranges instead.

Over the years my taste buds changed.  I now enjoy and appreciate the ruby reds, which brings me to my next creation --- grapefruit-flavored cupcakes.  I topped them with a self-crafted cream cheese frosting, which after learning quick-and-dirty style from several YouTube videos, was fun and easy to do.


GRAPEFRUIT CUPCAKES with HONEY-GRAPEFRUIT CREAM CHEESE FROSTING
(made with the help of Alida's Kitchen)
Makes: 10-12 cupcakes
 
Ingredients
Cupcakes:
1 cup all-purpose flour
1 1/2 tsp. baking powder
1/4 tsp. salt
6 Tbsp. unsalted butter, softened
2/3 cup granulates sugar
2 large eggs
1/2 cup Greek yogurt (nonfat or 2% reduced-fat)
1 tsp. vanilla extract
2 Tbsp. pink grapefruit zest (approximately 1 large grapefruit)

Frosting:
4 ounces cream cheese, softened
1/4 c. butter, softened
3 cups powdered sugar
1/2 tsp. vanilla extract
1 Tbsp. honey
1/2 tsp. pink grapefruit zest
2 tsp. pink grapefruit juice
 
 
Variations:
Substitutions - Replace grapefruit with any other citrus fruit.
 
 
Instructions:
*HINT: Foil cupcake liners work best, but when using paper, spray the liners with cooking spray before filling to reduce sticking.
  1. Preheat oven to 350 degrees.  Fill 12-cup muffin pan with cupcake liners.  Set aside.
  2. In a medium bowl, combine flour, baking powder and salt.
  3. In a large bowl, beat butter and sugar with an electric mixer until light and fluffy.  Add eggs; mix until smooth.
  4. To the butter mixture, add half of flour mixture, and combine; repeat with remaining flour mixture.  Add yogurt and vanilla, blending with a rubber spatula.  Fold in zest, mixing until just combined.
  5. Divide batter evenly among prepared muffin cups (about 2/3 full).  Bake for 12-15 minutes, or until a toothpick inserted in the center comes out clean.  Remove from oven and let cool for 5 minutes.  Transfer cupcakes to wire rack to cool completely before frosting. 
  6. To make the frosting, place cream cheese and butter in a medium bowl and beat on medium speed until smooth and creamy.  Add powdered sugar slowly, 1/2 cup at a time, until incorporated.  Add vanilla, zest, juice, and honey, beating until smooth. 
  7. After cupcakes are completely cooled, frost (frosting tip 1M used in picture).
Note: Because frosting needs to be refrigerated, frost cupcakes immediately before serving for best results.  Frosted cupcakes should not be left in refrigerater for more than a couple days.  Bring cupcakes to room temperature before serving.


Sunday, January 20, 2013

Brooklyn Food Tour #1

On the very first day that I moved to New York City, I did what any foodie and her foodie friend would do...I went on an impromptu food tour.  Though it was relatively short because of time and our eyes being a fair amount larger than our stomachs, it's still one of my favorite memories of my time here.  Both of us familiar with the food culture and charming vibe of restaurants in Atlanta, we set our sights on a few similarly cozy spots in Cobble Hill, Brooklyn.  From Italian to Ethiopian, we ate and drank our way down Court Street, exploring the neighborhood and all that it had to offer. 
 
So naturally, when my friend Rachel proposed a first of many food tours of our surrounding area, I immediately jumped at the opportunity.  Thanks to her thorough research and careful planning, our first food tour together, from Prospect Heights to Greenpoint, was a huge success! 
 
 
1. DOUGH
 
Definitely one of the better doughnuts I've had and not too far behind Doughnut Plant on my favorites list, the inside of these doughnuts have a fluffy and almost croissant-like texture that practically melts in your mouth. For my taste, the icing was just sugary enough and the almonds were a nice crunchy addition to the pastry that didn't quite seem to be large enough in size. Overall, not too shabby of a doughnut, and I would definitely go back for a second round - maybe for the chocolate with cocoa nibs... or hibiscus...or toasted coconut...or...?  Yumm.
 
Dulce De Leche with Almonds

The locally roasted coffee sold here may also be worth checking out, or if nothing else the witty flavor palette descriptions on the bag.  They can serve as a good distraction while you're waiting in line.
Warning: It may not help control the drooling.


2. GOURMET GUILD

Open a little less than a year, I thought this local Williamsburg food and goods market was a great find with a lot of potential.  There were small selections of infused oils and balsamic vinegars (always a favorite of mine), fresh meats and cheeses, and gifty items like cookbooks and made-in-Brooklyn novelties.  To put the icing on the cake, they will soon be opening a hot food section, which will include a variety of Thai-inspired breakfast dishes. This alone will render this market a no-brainer stop for a bite to eat.


3. SALTIE

I have to say, this cute little nautical-themed sandwich shop was not what I expected at first glance, but little did I know what we were in for. After reading a long list of sandwich descriptions and ooing and ahhing over the options, we decided on the "Scuttlebutt," filled with hard boiled eggs, feta, capers, pickled veggies, and a to-die-for cheese sauce.  The sandwich was unlike any I've ever had before and was a refreshing combination of flavors and color. Oh, the color! Thank goodness for lots of napkins because the bright pink was literally oozing out of every corner. I give this sandwich a 4.5 out 5 stars (come on, no one is perfect).


4. BROOKLYN KITCHEN

Another great stop for the food and kitchen lovers of New York. Best part? They offer a large number of cooking classes on the upstairs level.
 

5. VAN LEEUWEN ARTISAN ICE CREAM


The perfect way to end the tour was with a large helping of ice cream from Van Leeuwen. With so many mouth-watering flavors to choose from, we ended up going for the classic indecisive route - splitting each of our cups. Cinnamon, Mint Chip, Pistachio, and Giandujia (the fancy name for Chocolate Hazlenut) at a half cup of each made for a very satisfying flight of ice cream and happiness all around.


Metrics:
Cost per person - $15
Distance walked - 3.7 miles
Day full of cultural education and good food - priceless